| by Edward Tobolski
When it comes to hardness testing,
instruments that use the newer closed-loop systems are proving
most effective for performing a wide range of tests. Their
inherent design features offer benefits that can significantly
improve performance compared to the dead-weight testers
widely used in industry today. These older testers can’t
match the repeatability, stability and flexibility of a
tester with a closed-loop system. Thus, if your business
requires a hardness tester that provides the best possible
test results, you should definitely consider one that uses
a closed-loop system.
For more than 75 years, the most common hardness testing
instruments have used dead weights to apply test forces.
The reason for this is fairly simple: Dead weights are relatively
inexpensive and easy to manufacture to the degree of accuracy
required by commonly used test methods. The problem is that
the force must be applied to the test piece through some
type of small indenter. Transferring any dead-weight force
to the tip of a small diamond or ball indenter—especially
a force as great as the 150 kg used for a Rockwell HRC scale
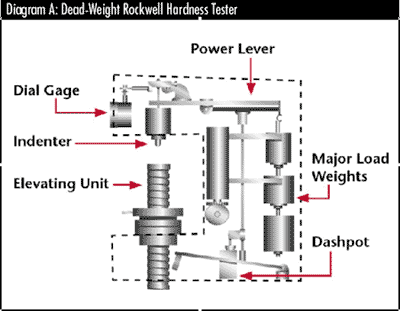
test, for example—is difficult to accomplish. The
large size and mass of a 150 kg weight requires designers
to use smaller weights with levers to intensify the force
to the desired levels. Levers require pivots, guides and
other friction-producing elements that can introduce errors.
Although instrument manufacturers have done an excellent
job trying to control these sources of error, any friction
point in the system will have a negative effect that increases
during use.
It’s also difficult to control the weight’s
application in a dead-weight system. Because the dead weight
must be moved to apply the test force, stopping it quickly
without overload and oscillation is problematic. Many older
testers use dashpots to control the application; however,
these are prone to serious variations in test results because
of seal wear and temperature changes. Many newer designs
have replaced dashpots with motors. Although this eliminates
some dashpot problems, the need to perform tests quickly
makes motor speed critical, and as a result, force overshoot
and oscillation are frequent problems.
Instruments that use dead weights are normally open-loop
systems. In other words, the forces are applied based upon
the calculations of the weights, lever ratios and the like.
Typically, a manufacturer will perform an initial calibration
on a dead-weight hardness tester to ensure that the forces
applied are within tolerance. They do so by using an independent
measuring device, usually an electronic load cell. The instruments
are seldom checked again because it’s assumed that
forces remain consistent as each test is performed. Although
dead-weight systems have proven to work very well in many
applications, including hardness testers, there’s
always a performance level that typical (i.e., affordable)
dead-weight systems can’t surpass because of inherent
problems.
During the 1950s, closed-loop systems came into common
use on tensile testing instruments. Closed-loop systems
differ from open-loop systems in that they electronically
measure the force being applied during every test and then
feed—or loop—the information back to the control
system. This system is designed to use the feedback to adjust
the force application mechanism to apply only the desired
force. Closed-loop systems work so well that today all electronic
tensile/compression instruments exclusively use closed-loop
control.

Not only is a closed-loop system able to constantly measure
the test force being applied, but the components used in
a closed-loop system inherently lend themselves to a much
simpler design than those in a dead-weight system. As mentioned,
dead-weight systems require levers, pivots and other friction-inducing
components to function efficiently (see Diagram A). The
indenter, the only part of the system in contact with the
test sample, is detached from the weight, separated by the
levers, pivots, etc.
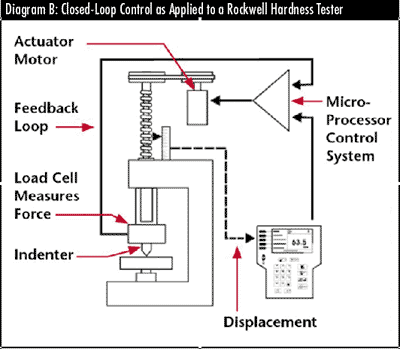
In contrast, a closed-loop system’s main component
is a strain-gage load cell. This compact, low-weight device
provides an electronic output proportionate to the force
applied to it. Load cells come in many different shapes;
it’s therefore possible to design a hardness system
with the indenter attached directly to the load cell (see
Diagram B). With this design, sources of error between the
indenter and the test force are eliminated.
These designs use actuators to apply the test forces,
and although these actuators have bearings and sliding surfaces
that may introduce friction, the design isolates these negative
influences above the load cell so they don’t affect
the critical test force. If, for example, friction in the
actuator is so excessive that the desired force isn’t
applied to the indenter, the load cell won’t indicate
the correct force; therefore, the system will abort the
test rather than give an incorrect result. In this way,
the system constantly checks itself to make certain that
only the correct test forces are applied to the indenter.
The actuator’s mass can easily be controlled because
of the feedback loop.

A common way to measure the performance of a hardness
tester is to use gage R&R techniques. This method quantifies
a measuring instrument’s performance by comparing
variations from the instrument against the total variations
allowed for the part being measured. The result is a percentage
that indicates how much of the tolerance is being used up
by the instrument itself. The smaller the percentage, the
better the instrument’s performance. Typically, those
who use this method want to obtain gage R&R results
of 10 percent or less, although 30 percent is acceptable
in some situations. Hardness testers frequently fall into
the 30-percent category because they often don’t perform
well, and variations within the sample consume a percentage
that’s difficult to quantify.
Depending on the hardness tester’s age and design,
gage R&R results from standard dead-weight Rockwell
scale testers normally range from 12 percent to 25 percent.
Under tightly controlled, ideal conditions, the 10-percent
target has been reached. Under the same conditions, a properly
designed Rockwell tester using a closed-loop system can
routinely achieve less than 7 percent, and tightly controlled
units have achieved results as low as 2 percent. (Note:
2 percent is considered the lowest attainable percentage
because of the nonuniformity of test samples.) In addition,
closed-loop systems have proven to be more stable, which
increases the test data’s reliability.
How important are test results? If you’re simply
trying to verify whether a part has been heat-treated, achieving
10 percent of gage R&R improvement may not be important.
However, if you’re working to specific tolerances,
any reduction in the uncertainty of your results can save
money by minimizing the possibility of either rejecting
a good part or accepting a bad one. A better knowledge of
the hardness value makes it possible to adjust processes
for the most economical operation.
Uncertainty is the buzzword today for people in charge
of calibrations. Anyone working to ISO 17025 must provide
an uncertainty statement with most calibrations performed,
including hardness. It’s a logical extension that
customers may someday ask for uncertainty statements with
every test performed. Although this will be a difficult
value to determine accurately, the calculation will be influenced
significantly by the hardness tester’s performance.
The better the hardness tester performs, the lower an uncertainty
will be.
Hardness testers using closed-loop systems are available
for Rockwell, Vickers, Knoop and Brinell testing in a variety
of test force ranges. Load cells typically have force-range
limitations of 100 to 1. In other words, if the lowest force
were 10 kg, the highest force would be 1,000 kg. This is
normally a greater range than most dead-weight testers provide.
Additionally, a closed-loop system allows the use of any
incremental force within the acceptable range. Dead-weight
systems, on the other hand, are restricted to the discrete
weights. Some of the newer load cells can exceed the 100-to-1
limitations.
Another benefit derived from closed-loop systems is inherent
flexibility. Because the force application process is controlled
by a microprocessor, test cycles can be changed easily.
Not only is this feature desirable for special testing requirements,
but it also guarantees that a tester can be easily modified
to meet any new or revised test method. This can be very
helpful if you’re interested in having, for example,
a Rockwell tester that can match the time cycles used on
the new Rockwell hardness standards from the National Institute
of Standards and Technology.
Edward Tobolski is a 27-year veteran of the hardness testing
industry. He served as the engineering manager of Wilson
Instruments before becoming the company’s president
in 1990. Since the 1993 acquisition of Wilson Instruments
by Instron Corp., Tobolski has held the executive position
of general manager of hardness products. Letters to the
editor regarding this article can be sent to letters@qualitydigest.com.
|