by Johannes Kaindl
The spectrum of industrial microscope applications is very wide and includes everything from detecting structural defects (such as pores and blowholes in die-cast components) to porosity measurements of plastics and detecting crystalline substances in ointments. Continuing miniaturization, higher packing densities and rigorous quality requirements necessitate the use of microscopic evaluation systems to detect and meas-ure the increasingly small dirt particles that can impair the functionality of technical components or pharmaceutical products.
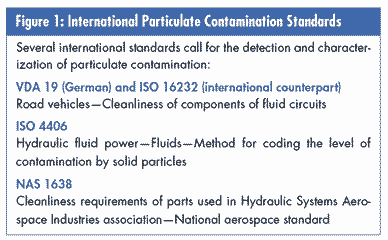
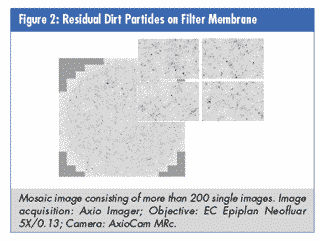
However, contamination by large particles has been and still remains a particularly difficult problem, with national and international standards requiring organizations to detect and measure dirt particles of all sizes and document the results. (See figure 1.) Currently the industry is focused on detecting dirt particles on round filter membranes. (See figure 2.)


In the automotive industry, for example, components are rinsed with a defined amount of fluid and the dirt particles washed off. The cleaning fluid is then pressed through a round filter membrane. The washed-off dirt particles are caught by the filter and can then be analyzed. The goal is to get a representative distribution of the number of particles in a given particle class (i.e., particles with similar characteristics that fall statistically in the same general category). Usually, the technician checks this result against the maximum number of particles allowed in that particular class of particles. If the inspection shows too many particles of a particular class, then the manufacturer must find out where the particles came from to avoid future contamination.
This procedure is used in almost the same way in the pharmaceutical industry for examining parenteral fluids, or at wind-energy plants for checking service intervals of lubricants.
A pharmaceutical company measures active substances in crystalline form in ointments. In this case, ointments such as fungicidal preparations for the skin and mucous membranes are tested for the suitable distribution of the active substance in the matrix material of the compound, which is present in crystalline form. The samples come either from new products that are being developed or from finished tubes of ointment, the quality of which is checked during production. Under the transmitted-light microscope, the ointment is spread onto a slide and analyzed in polarization contrast using a 10X and 20X objective. The crystals of the active substance are clearly visible as dark structures and can be assessed using image analysis. To validate the system, an area standard (i.e., a circle with an area of 100 µm²) is measured each month, and the measured value compared with the reference value. One important feature of the system is the ability to detect and measure both large crystal agglomerates and extremely small particles in just one step and compare the particle distribution with the distribution stipulated in the company's standard operating process. (See figure 3.)
Sometimes particles only a few microns in size must be reliably recognized and measured, so the need for a microscope-based analysis systems is almost inevitable.
However, when selecting and using such systems, the following three function-critical issues concerning the size of the particles to be measured must be taken into consideration:
1. To be able to measure the geometric data (e.g., length, width, area) of particles, their shape must be recognized correctly. What resolution must a measuring system feature to enable even the smallest particles to be measured correctly?
2. A microscope can only show a limited area of a sample. How should large dirt particles be treated that aren't visible in the field of view?
3. To enable results to be compared over a long period of time, they must always be obtained under the same conditions. How can complete reproducibility be ensured?
The theoretical basis for the required minimum resolution is provided by the Nyquist-Shannon sampling theorem. With regard to analyzing images, this states that the smallest detail to be resolved must be sampled using at least two pixels. When an image is recorded using a CCD camera, an imaginary grid is laid over the image, and a brightness or color value is then determined for each square of the grid. This results in a circle being imaged as a square if sampled using four pixels (i.e., two pixels horizontally and vertically, as shown in figure 4). If the original circle is 100 µm in diameter, the measurement of the diagonal as the longest diameter then produces a value of 141.42 µm.
Some guidelines therefore request, quite justifiably, that sampling should be made with 10 pixels over the smallest dimension. The measurement will then result in 101.98 µm, or an acceptable error of approximately 2 percent.
How can one achieve this resolution? In general, different parts of a system will influence the final pixel scaling: the microscope (i.e., objective, tube lens and camera adapter) and the CCD sensor of your camera (i.e., size and camera resolution).
There's no universal rule on how to determine what kind of system you should use; it always depends on the size range of the particles you'd like to analyze. However, as a rule of thumb, for particles 50 µm and larger, you should use a stereo microscope, and if you must analyze particles less than 50 µm in size, you should work with a compound-light microscope. This doesn't mean that it isn't possible to analyze particles smaller than 50 µm with a stereo microscope, but the above is a general recommendation.
When acquiring images of small particles with the appropriate r esolution, it's inevitable that only a part of the sample is captured by the camera image. As a result, particles are cut off at the edge of the image, particularly where large particles are concerned. (See figure 5.)
Today, these problems can be solved with mosaic images. The sample is automatically moved via a motorized stage, and single images are acquired in each position. These single images are then put together to form a large overall image. This solves the problem of particles being cut off as long as the movement of the stage is accurate enough. Theoretically, the stage reproducibility should be better (i.e., a lower number in microns) than the pixel scaling. A typical value for this reproducibility is approximately 1 µm, which is sufficient for the pixel scaling seen in figure 4. What can you do if this isn't enough? There are two possibilities. Either use a motorized stage that's more accurate (and much more expensive) or use a stitching algorithm, which recalculates the correct positions of the different images relative to one another. The disadvantage of a stitching algorithm is time. You must acquire images with an overlap factor and subsequently do the stitching. This is the reason why most people avoid using software stitching, if possible.
Reproducibility is understood to mean the degree to which a measurement can be repeated. The question is, to what degree are single measurements made under the same conditions identical?
Excellent reproducibility requires the following:
• All instrument settings must be read out and readily available for the measurement.
• Data (e.g., scaling, illumination) must be saved along with the image.
• The image data must allow the recording situation to be reproduced at any time.
• The system must be regularly validated via a measurement standard.
• The motorized stage must be calibrated (e.g., point of origin, directions of movement).
The Particle Analyzer from Carl Zeiss is specifically designed to address these issues. It exclusively uses the mosaic-image technique to ensure the correct measurement of all particles--from only a few micrometers to the millimeter range. If the reproducibility of the stage is too low, a software stitching step can be implemented directly after acquisition. New developments allow large mosaic images to be handled by image processing and measuring software. In principle, the solution for displaying large images irrespective of memory is simple: The overall image isn't stored in the memory in its entirety, but in a resolution-reduced form. Only the relevant sub-regions of the image are loaded for display on the monitor, meaning that the memory is burdened only with the current frame. This is a well-known technique that has already proven itself for some time--for example, on the Internet. What's new, however, is the expansion of this technique to the processing and measurement functions of the Particle Analyzer. Using an analysis system, it's now possible to evaluate images that are bigger than the available RAM of a computer. This means that you no longer have problems with varying particle sizes. Dirt particles that cross over fields can now be measured in their entirety; the particles are no longer cut off at the edge of the image.
Moreover, reproducibility of image acquisition and evaluation is guaranteed, thanks to motorized microscope systems. In the case of the AxioVision ZVI from Carl Zeiss, all recording parameters are automatically read out over a serial interface or a USB connection and directly saved: zoom setting (from a stereo microscope) and objective magnification (from a compound-light microscope), illumination setting, contrasting technique, camera settings and scaling factors. These recording parameters can also be saved and automatically reactivated for subsequent evaluation without the user making any settings on the system.
New demands on quality assurance require solutions that seemed impossible until now. However, the merging of microscopy, digital-camera technology and computers allows the implementation of system solutions that make it easy to meet contradicting requirements such as measuring complete samples while simultaneously recognizing the smallest particles.
Qualified engineer Johannes Kaindl is product manager at Carl Zeiss AG, where he's responsible for materials microscopy systems.
|