| by Arnold Free, Ph.D.
For many industries, portable coordinate metrology systems are a standard element in production processes. From laser trackers that oversee airframe construction to portable arms and scanners that check smaller parts, assemblies, and tools, portable measurement systems provide the versatility and functionality that traditional coordinate measuring machines (CMMs) just can't match.
Portable coordinate metrology has been designed primarily as a user-driven interactive tool based on an "expert" end-user application. Putting the measurement process in the hands of novices has created problems. Users of these tools must be trained in the various metrology systems, often with completely different software interfaces. This is particularly true when several types of measurement systems are used for one measurement process. For example, combining the probing or scanning capabilities of a portable arm with the large-volume accuracy of a laser tracker for a single process usually requires expert-level software and users. If the measurement systems are from different vendors, then the process is particularly difficult to implement because portable-CMM vendors tend to provide software that's specific to their own hardware.
Traditional CMMs have been running inspection programs for decades, but what about laser tracker, laser scanner, or portable arm systems? These can't always be automated in the same way, and they often require a person to take a measurement. The human element can be scripted and the underlying results analyzed, but you're still working with nonintegrated systems.
Collaborative measurement software makes it possible to unify portable CMMs from different vendors in a single process. Imagine combining the capabilities of different portable CMMs into a single, reliable, automated process. Portable arms, laser trackers, scanners, and even digital photogrammetry can take on new roles and become accessible to more users.
Such a system was implemented at Volvo's Novabus division near Montreal, and the time saving has added up quickly.
With more than 20 years of experience, Novabus is among the largest manufacturers of city, suburban, and shuttle buses in North America. Recognized as a leader in producing stainless steel frames, the company manufactures buses that have been highly reliable in major cities such as Chicago, Nashville, and Montreal. Maintaining a strong competitive edge compelled Novabus to restructure manufacturing processes to reduce inspection time and increase production volume, while simultaneously improving quality.
Bus-frame inspection at Novabus formerly required two inspectors and took up to 10 man-hours per bus. Laser trackers were used for large-volume measurement within the bus frame and its undercarriage. Portable arms were used for more detailed parts of the frame as well as for probing into mounting points that are difficult to measure with a tracker due to laser line-of-sight issues. In the old process, inspectors could script individual measurement operations, but there was no way to perform measurements collaboratively throughout the vehicle or to analyze the results overall. Scripting was limited to individual programs that inspected isolated details, rather than the entire vehicle. Operators had to know the entire process, which scripts to use and where, and how to best position the equipment. They also had to be experts in using the metrology software. Analyzing inspection results was time-consuming and often involved downstream analysis and interpretation. The process was long, could be performed only by trained experts, and didn't always provide the quick and reliable feedback needed to make informed manufacturing decisions.
Novabus solved these issues by using a collaborative and automated inspection process from Metrix Software Solutions. This involved combining a laser tracker and portable arm to script a collaborative measurement process for an entire vehicle. Because measurements are needed throughout the frame interior, exterior, and undercarriage, the process also involved positioning the portable CMMs at several locations within the measurement volume. To perform a vehiclewide analysis of the measurements to nominal design geometry, the measurements had to be integrated into a single network.
The solution involved using anchor points within the frame that could be repeatedly measured and act as a common network to bundle the overall measurements. Measurements taken at a single inspection location with an arm were integrated into the overall vehicle profile using features on the vehicle that were also measured with the tracker.
The measurements were then inspected automatically against design nominals using the automation software's built-in evaluation engine. The system uses design nominals to align all measurements into the vehicle coordinate system and compare measurements against nominal design points and surfaces. For example, hole locations for equipment mount points on the frame, door, and window openings, as well as various axes for hinge lines and equipment mounts, are all inspected against nominal geometry and specified tolerances.
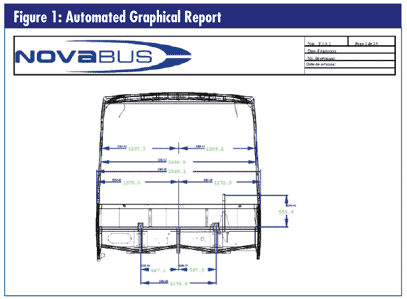
Reporting is often overlooked when automating inspection processes. In the end, an inspector wants to see clear, concise results so that issues can be communicated quickly within the organization. Lengthy text-based reports and spreadsheets aren't effective for this task, so at Novabus, the reporting process is completely automated and graphics-based. Measurement results and variations from nominal geometry are shown entirely in drawings. This makes understanding inspection results quick and easy for everyone on the shop floor. In addition, the first page of the report summarizes out-of-tolerance exceptions, so problem areas are quickly identified. These basic results can make a big difference in how the information is used. An example of a typical automated graphical report is seen in figure 1 below.

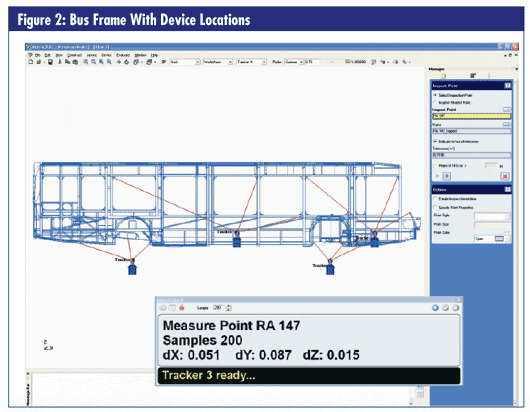
Within a few months of implementing the collaborative measurement software, Novabus realized an 80-percent time saving. A process was created to guide an inspector through a simple, one-button measurement. Inspectors now follow a sequential, multi-station process that ensures consistent, repeatable measurement. What previously took 10 man-hours to complete can now be accomplished in two—several hours fewer than the original goal. A unified software platform simplifies the process of working with multiple devices. The same one-button measurement process collects data from both the portable arm and the laser tracker, and all measurement data are easily merged into the vehicle coordinate system. Figure 2 below shows a multistation setup illustrating how the tracker and arm measurements can be bundled into a single vehiclewide measurement result.

Collaborative measurement software has improved the measuring and understanding of objects with intricate geometries ( door frames, for example) that previously had to be measured by hand. For the first time, Novabus can analyze dimensional data across an entire vehicle without having to manipulate the data manually. Inspection analysis and reporting are completely automated and reliable, and results are no longer questioned. In addition to the immediate benefits of reducing inspection time, Novabus identified opportunities for further process optimization. Consistent vehiclewide coordinate data mean that the ideal inspection frequency of specific features can be identified and adjusted accordingly. Likewise, overall process simplification and ease of use make it possible for Novabus to quickly train operators with little or no metrology experience and maintain an acceptable level of quality control.
Having a measurement process that provides timely feedback is a tremendous advantage. Inspectors no longer have to return to the office to crunch numbers; inspection results are presented graphically on the 3-D model and through reports incorporating 2-D drawings. Combining 2-D drawings with traditional dimensioning and tolerancing allows shop personnel to understand results and make corrections during the manufacturing process. With dimensional results available in real time, downstream assembly processes can immediately be evaluated by manufacturing engineers and potential problems averted.
For Novabus, the immediate benefits are clear:
• A single, simple, reliable measurement and inspection process that can be completed in a fraction of the time it takes to complete manually
• Ability to combine the large-scale measurement capabilities of a laser tracker and the detailed probing of a portable arm into a single measurement solution
• Can be used by new operators, and training is quick
• Consistent inspection reports, as well as archived 3-D inspection models, can be viewed and analyzed off-line.
• Vehiclewide analysis allows for a better understanding of the manufacturing process and critical areas for inspection.
The applications for automating collaborative measurement using several portable CMMs are many. These might include a single device and operator engaged in a multistation measurement, or even several devices working collaboratively in real time, performing fully automated processes.
For example, several laser trackers can be combined to perform collaborative assembly or mate processes for large structures such as airframes. Digital photogrammetry or laser trackers using an unattended aim-and-measure absolute-distance function can measure specified targets and thereby perform fully automated. No operator is required. Laser scanners and robotics can also be employed in automated inspection. The best of several technologies can be brought together to deliver solutions for the most complex applications.
All of these applications are best implemented using an open and collaborative metrology engine that can link to human/machine interface (HMI) control systems as well as other applications for product life-cycle management (PLM) or statistical process control (SPC) data management. By using a common open architecture, any end-user application can be integrated within a real-time measurement or inspection process. This open approach offers advantages over the traditional scripting approach used in many metrology software packages. First, it can integrate industry-standard HMI tools and technology. Operations can be hugely simplified using an HMI approach, (e.g., showing a nonexpert operator only what's needed to get the job done). Second, multiple portable CMMs or other controls from various vendors can be integrated into a single platform. Third, the entire system can be programmed to fetch design data and return inspection results to companywide PLM systems or SPC databases.
Using portable coordinate measurement systems is becoming more common in many manufacturing applications. However, compared to decades of traditional CMM use, the technology is in its early stages in industries where experts performed mostly manual processes. Hardware- independent, collaborative metrology software now allows measurement and inspection processes to be fully automated and integrated. The software brings together the best of several vendors' solutions to simplify and build reliable processes that can't be solved by a single technology. Automation software can simplify and speed up measuring processes, even for interactive, operator-based measurements. Leading manufacturers such as Volvo's Novabus have achieved huge time savings on the shop floor with this software and can control product quality like never before.
Arnold Free, Ph.D., is president of Metrix Software Solutions Ltd. (www .metrix3d.com) , a 3-D portable metrology integrator that specializes in designing and implementing measurement, assembly, and inspection systems. Free has a doctorate in engineering from Cambridge University, United Kingdom, and more than 20 years of experience in the manufacturing, computer-aided design, and computer-aided engineering industries.
Metrix will be exhibiting at CMSC in Reno, Nevada, July 16–20, in booths 408 and 508.
|