by Tom Nelligan
Ultrasonic testing is hardly new. For thousands of years, bats and dolphins have used high-frequency sound waves to learn about their environments. Humans have used ultrasonic instruments in industrial test and measurement applications since the 1950s. But in recent years, as hardware and software development has advanced, ultrasonic testing has grown into a more powerful, reliable and user-friendly tool for quality control and in-service inspection. The technology is routinely used to measure wall thickness, detect hidden cracks and other anomalies affecting structural integrity, and analyze basic material properties. For these purposes, a variety of sophisticated microprocessor-based instruments are available from commercial suppliers.
Ultrasonic thickness gages are usually employed in situations where an inspector has access to only one side of a part whose thickness must be determined, or where simple mechanical measurement is impossible or impractical for other reasons, such as part size. Common applications range from measuring remaining wall thickness in corroded pipes and tanks, to quickly checking the thickness of molded plastic bottles and containers, to examining products as diverse as fiberglass boat hulls and soft contact lenses. Ultrasonic flaw detectors can find internal cracks or discontinuities in welds, structural metals and composites, castings, braze joints and similar applications involving common engineering materials. Phased-array imaging systems that are similar in concept and design to medical ultrasound instruments can be used to create detailed cross-
sectional or planar pictures of the internal structure of a part. Ultrasonic testing is always completely nondestructive, with no cutting or sectioning required. Unlike radiography, it requires no special health and safety considerations with respect to its low-energy sound beam.
Sound waves are all around us, in the form of mechanical vibrations carried through air or water. Ultrasonic testing involves frequencies beyond the upper limit of human hearing, higher than 20 kHz and most commonly in the range of 500 kHz to 20 MHz, although higher and lower frequencies are sometimes used.
A specific test frequency is selected based on the given application. Higher frequencies have a shorter associated wavelength, permitting the measurement of thinner materials and the detection of smaller flaws. Lower frequencies with a longer wavelength will penetrate farther and are used to test very thick samples or materials such as fiberglass and coarse-grained cast metals that transmit sound waves less efficiently. Selecting an optimum test frequency often involves balancing the requirements for resolution and penetration. In the ultrasonic frequency range, sound waves are highly directional, and although they'll travel freely through typical metals, plastics and ceramics, they'll reflect from an air boundary such as an inner wall or crack.
Ultrasonic test instruments use transducers that generate short pulses of ultrasonic energy coupled into the test piece. The transducer is excited by a short electrical pulse, which it converts into a brief burst of ultrasonic vibration. For efficient sound coupling, a drop of liquid or gel is used to fill the thin air gap between the face of the transducer and the test piece. The ultrasonic vibration travels as a wave through the test piece. Reflections travel back to the transducer, where they're converted back to electrical energy and processed by the test instrument. Analysis of that reflected sound energy is the key to ultrasonic testing.
Ultrasonic thickness gages work by measuring how long it takes for an ultrasonic pulse to reflect from the far side of a test piece. The instrument is programmed with the speed of sound in the test material, and because distance or thickness equals velocity multiplied by time, wall thickness can be readily calculated from the programmed velocity and the measured pulse transit time. Unlike a micrometer or caliper, ultrasonic gages require access to only one side of a part in applications such as tubing or small containers, where the inside surface is impossible to reach without cutting. Most common engineering materials, including metals, plastics, ceramics, composites and glass, can be measured. Online or in-process measuring of materials such as extruded plastic or rolled metal is possible, as is measuring many coatings over substrates and individual layers in multilayer parts such as plastic coextrusions.
For any ultrasonic gaging application, selecting an optimum gage and transducer is based on the type of test material, its thickness range and the degree of measurement accuracy required. It's also necessary to consider part geometry, temperature and any other special circumstances that might affect the test setup.
Sound velocity calibration is an essential part of any ultrasonic measurement. Because the speed at which sound waves travel varies widely between different materials--roughly twice as fast in metals as in plastics--it's always necessary to
calibrate an ultrasonic gage against a reference standard of known thickness for the material to be tested. In the case of high-temperature measurements, it's also necessary to remember that sound velocity decreases with temperature, so for optimum accuracy the reference standard should be at the same temperature as the test piece.
Commercial ultrasonic thickness gages are generally divided into two types: corrosion and precision. Perhaps the most important application for ultrasonic gaging is measuring the remaining wall thickness of metal pipes, tanks, structural parts or pressure vessels which are subject to internal corrosion that can't be detected from the outside. Corrosion gages are optimized for this type of measurement, and they use specialized dual-element transducers with separate transmitter and receiver elements angled toward each other to create a V-shaped sound path in the test material.
Measuring with dual-element transducers isn't quite as accurate as other approaches (typically +/- 0.004 in. or 0.1 mm), but they perform better on the rough, pitted surfaces often found in corrosion survey applications and can readily be adapted for high-temperature measurements. Corrosion gages also employ signal-processing techniques that are optimized for detecting the minimum remaining wall thickness in a rough, corroded test piece.
Precision gages that use single-element transducers in which the same piezoelectric element both transmits and receives are recommended for all other measurements, including smooth metals, plastics, glass and ceramics. Although accuracy will depend on specific test conditions, accuracies as high as +/- 0.0001 in. or 0.003 mm are possible in optimum cases, and accuracies of +/- 0.001 in. or 0.025 mm are typical. Some common applications include molded or extruded plastic parts (including multilayered plastics), cast or machined metal parts, plastic or rubber tubing, rubber tires and conveyor belts, plastic cable jackets, glass bottles and bulbs, fiberglass and composite layups, and ceramic parts. Most applications use small, hand-held transducers, but some complex geometries as well as online testing require noncontact transducers that focus a sound beam through a water column or bath. Measurements are essentially instantaneous and can be recorded on internal instrument data loggers for documentation or analysis.
Ultrasonic flaw detectors also examine reflected sound waves, looking for distinctive echoes that reflect from cracks, voids, disbonds or other discontinuities in a test piece. High-frequency sound waves will travel through solid, homogeneous materials such as a steel beam or a uniform weld in a predictable pattern, and that pattern will be disrupted by a crack or similar discontinuity. A flaw detector displays these echo patterns on a screen. By comparing the echo pattern from a reference part with the echo pattern from a test piece and looking for differences in echo amplitude or position, a trained operator can identify hidden flaws before they become a problem.
Weld inspection, including spot welds, is the most important application for ultrasonic flaw detection, along with testing steam boilers and pressure vessels, structural steel, critical aircraft parts (metal and composite), automotive parts, and railroad wheels, axles and rails. There are also less common uses, such as checking the bonding of covers on golf balls, the integrity of composite baseball bats or the quality of braze joints in relay contacts.
Most contemporary digital instruments are battery-powered and completely portable, and offer sophisticated software aids for plotting reflected signal variations and interpreting results.
In flaw-detection applications, transducers are designed to introduce sound energy into the test piece in such a way that reflections from potential discontinuities will be maximized. This often involves using angle beam assemblies, small plastic wedges that aim the beam from a transducer at a selected angle that provides the optimum beam alignment for identifying a particular flaw. In other cases, sharply focused transducers are used to concentrate energy at a selected point in the test piece and improve detection of very small discontinuities in that area. An advanced form of ultrasonic scanning involves automated imaging systems that sweep a beam across the test piece according to a programmed plan, producing pictures that look much like colored X-rays but without the hazards associated with radiation exposure.
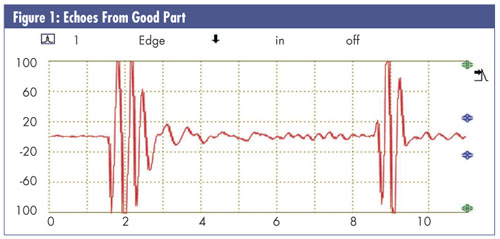
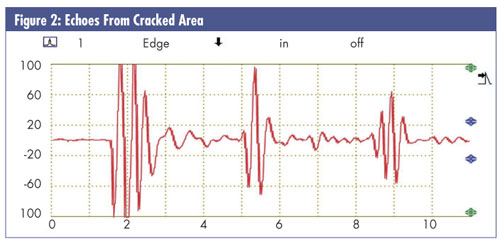
Figures 1 and 2 below illustrate a typical test involving a steel plate with a small hidden internal crack. Figure 1 shows the reflected echo pattern from an uncracked part of the plate, with the two large peaks representing the echoes from the front and back surface. In this case, the operator establishes that this is the pattern representing undamaged material and that any changes in that pattern indicate a change in the test piece's condition. Figure 2 shows the different pattern from a cracked area, with a third peak appearing between the other two. The presence of a significant reflector between the front and back surfaces of the plate indicates a discontinuity, in this case a laminar crack.


Changes in a material's physical structure will affect the way a sound wave passes through it. Ultrasonic material analysis involves measuring parameters such as sound velocity, attenuation, scattering and the frequency spectrum to analyze or qualify material parameters that include elastic modulus, structural anisotropy, localized density variations, grain patterns, residual stress and crystal orientation. Using reference standards whose properties are known, an operator can correlate changes in these ultrasonic properties to specific material conditions. Depending on specific test requirements, instrumentation might be a thickness gage, a flaw detector or a specialized ultrasonic pulser/receiver system incorporating interpretive software.
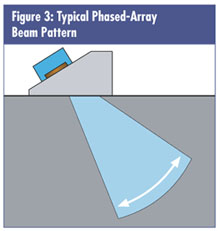
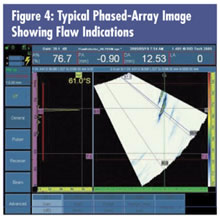
One of the newest technologies being developed in ultrasonic testing is phased-array imaging, a technique in which a multi-element array transducer is used to generate a sweeping beam that can examine a part from a number of different angles and focal points to create a detailed picture of internal conditions. This industrial approach is very similar to medical ultrasound imaging, and indeed, the resulting color-coded sector scans often resemble familiar medical sonograms. Phased-array technology offers the capability for high-speed electronic scanning without moving parts and greater flexibility for inspecting complex geometries. Changes in the internal structure of a part, such as a crack, will change the pattern of beam reflection in predictable ways. Instrument software maps these changes to draw a picture for interpretation by a trained operator.
In a phased-array system, individual transducer elements (typically 16, 32 or 64) are pulsed in groups with programmed time delays, creating interacting beam components that add and cancel in predictable ways--hence the term "phasing." By varying the sequence in which elements are pulsed, the operator can sweep the beam through a selected volume of the test piece and also dynamically focus maximum sound energy at selected depths corresponding to potential flaw locations. The complex pattern of returning echoes is then received by the array transducer
and processed by instrument software to create either a cross-sectional or planar view of the part's interior (as seen in figures 3 and 4 below).
 
Primary phased-array test applications currently include weld inspection and examination of aerospace composite structures, but as this technology comes into wider use, the range of industries in which it's employed is bound to grow.
This article offers only a brief introduction to the capabilities of ultrasonic testing. For more information, a number of Internet resources are available. Two recommended Web sites are NDT Net (www.ndt.net) and the Iowa State University Center for Nondestructive Testing (www.ndt-ed.org). Additionally, many manufacturers of ultrasonic test equipment provide theory and applications information on their Web sites.
Tom Nelligan is a senior applications engineer who supports the Panametrics-NDT ultrasonic product line for Olympus NDT, headquartered in Waltham, Massachusetts. He has worked in the field of ultrasonic testing since 1978.
|