by Stanley P. Johnson
Case Studies
The following case studies illustrate practical applications of noncontact thread-inspection systems.
A $1 billion manufacturer of precision-control components for aircraft, satellites and industrial machinery purchased a thread vision-inspection system to address looming problems of an aging metrology work force.
As current technology to calibrate threads depends upon user interpretation, experience is a critical element in any calibration laboratory. This metrology lab was staffed with technicians who were at or near retirement. Management was concerned about losing a talented team because replacing the team members' combined wisdom would be difficult. Management justified
the purchase of the system because it would replace the experience while improving productivity and providing accurate measurements irrespective of the operator.
A small manufacturer of precision components purchased a system to calibrate its plug gages and inspect threaded products. The company's primary customer is an $8.1 billion supplier of fluid power systems for vehicle components. When disputes arose relating to thread quality, the company found that reaching a fair resolution was difficult. The existing process provided thread measurement data that were often at odds with customers' own results. Invariably, the company was forced to accept a customer's analysis, which in turn led to excessive costs from sorting, scrapping and reworking. The system provided an objective measurement, then quickly and fairly resolved the dispute.
In a related case, a customer was having difficulty with its supplier's quality as it related to threaded components. Analysis using the vendor's traditional equipment indicated that the thread was within its design tolerance. A three-minute measurement cycle, however, showed deformation on the thread's flank angles. The user stored the file and electronically transferred the image of the thread to its vendor. The image, serving as definitive proof, ended the disagreement.
For a manufacturer of valves for the nuclear industry, in the time it would typically take to measure two characteristics, transcribe the number and then type the data in the company's database, a thread vision-inspection system provided data on 11 thread characteristics, printed the certification and stored the measurements electronically.
For a manufacturer of aerospace components, eight full-form calibrations could be performed during a typical day. During the week after installation, the company averaged close to 30; on one day it completed 55 unique inspections. The company no longer has to keep duplicate sets of gaging and can inspect its plugs more frequently. Management believes that this will lead to fewer thread-related problems and lower costs.
|
During the 1980s the U.S. Department of Defense grounded a fleet of UH-60 helicopters when spindles, which secure the rotor blade to the main mast, started separating from helicopters in flight. Elsewhere, an automotive manufacturer lost an entire day's production of engines when the engine block wouldn't stay mounted to the frame. A commercial airliner plunged into the ocean when its elevator stabilizer failed to respond to the pilot's commands. Prior to this, there were six separate incidents of commercial aircraft making emergency landings due to in-flight engine separations. In all these seemingly unrelated accidents, the underlying problem was thread failure.
Whether they're in aircraft, automobiles, skyscrapers or artificial hearts, threaded components hold the world together. However, if they're improperly manufactured or not maintained to specification requirements, the very products and structures that we depend upon are inherently compromised. It doesn't help that threaded component characteristics are difficult to analyze for dimensional conformity, quality and, ultimately, proper fit.
In the cases noted above, not all of the threads broke; some simply loosened and failed. Subsequent analysis confirmed that all were dimensionally nonconforming, and a dimensionally nonconforming thread--when torqued and subjected to stress, shock, temperature variation and/or vibration--will fail. The only way to ensure proper performance of a threaded component is to confirm that the thread's characteristics are dimensionally conforming. To make a sound decision about this, the examiner needs values for the actual thread characteristics.
Sadly, the stories above aren't isolated incidents. Military and commercial reports indicate that thread failure has led to loss of life. Yet based on a review of Federal Aviation Administration air-worthiness directives, commercial accident or incidence reports, and federal government accident reports, few studies that attribute the accidents to thread failure consider dimensional nonconformance of the bolt or nut. Hardness and material composition are routinely examined and could be culprits in threaded component failure, but as a pilot and a frequent traveler on commercial airliners, I'm alarmed about the lack of knowledge relating to the dimensional characteristics of threads and threaded components. (A General Accounting Office report titled "Military Fasteners, Changes to Specifications Justified" [report No. GAO/NSIAD-91-309] did indicate that dimensional nonconformance was a contributing factor to threaded component failure.)
A few statistics will illustrate my concerns:
• A company diligently completes receipt inspection on a shipment of threaded product. It's determined that the underside of the bolt head is approximately two degrees out of perpendicularity to the bolt's axis. This seemingly insignificant deviation will reduce the fatigue life of the assembly by 78 percent. (John Bickford, An Introduction to the Design and Behavior of Bolted Joints [Second Edition, Marcel Dekker Inc., 1990])
•During first-article inspection of an aerospace fastener, a company's machinist notes that a 0.6250-in. 18UNJ 3A/3B bolt and nut were both acceptable but at the minimum material limits for their respective tolerances. He passes the lot, and the threads move into assembly--let's say an engine-mount bolt. The results are within the tolerances listed in the American Society of Mechanical Engineers and military specifications, but because they're at the edge of the design limits, when assembled, the joint provides only 67 percent of its static shear strength (Bickford).
If a dimensionally nonconforming thread passes through inspection and is torqued, problems may arise. The dimensions that are out of tolerance decrease the yield point and the ultimate tensile strength of the thread. The assembler provides the required amount of torque (approximately 90% of yield), but he or she has unknowingly pushed through the nonconforming yield point. At this point the thread starts to lose its elasticity, is stretched and is permanently deformed. Pressure on the flank angle is lost, and the clamping force is subject to induced relaxation.
The goal of any sound fastener is to maximize flank contact over the entire length of engagement. But this simply isn't possible with a dimensionally nonconforming thread. According to Bickford, when flank contact is lost and clamping force diminishes, problems can arise, including:
• Static failure of the fastener
• Static failure of joint members
• Loosening of the nut and bolt through vibration
• Fatigue failure of the bolt
• Joint separation
• Joint slippage or leakage
There is good news. Commercial guidelines (e.g., ASME B1.1, B1.2, B1.13M and B1.16M), military specifications (MIL S 8879C and AS 8879C) and federal standards (H28-20) list the appropriate thread parameters that should be examined, and issue the proper tolerances for a given thread size. In addition, various technologies have been available for decades to examine threads, but there are pros and cons to each.
There are several methods for inspecting threaded products. At the beginning of the last century, Charles G. Johnson invented the AGD split-ring gage. It's a quick and intuitive way to ensure assembly. But a gage designed during the heyday of the Ford Model T isn't suitable to ensure dimensional performance into today's world. Furthermore, as the original patent states, AGD split-ring gages weren't meant to be adjusted in the field but only by the gage manufacturer using lapping procedures.
This is why European manufacturers almost exclusively use solid rings. Adjustments to a split ring will mismatch the helixes and force the ring to close in on a "tri-lobing" condition. Adjustments also destroy the concentricity between the major, pitch and minor diameter cylinders. Another concern emerges if the setting plug used to calibrate the ring possesses lead and angle error: The ring will be set oversized. This is because lead and angle error increase the effective size of the set plug and reduce that of the ring gage.
Fifty years ago Paul W. Johnson developed indicating gages. These are excellent tools for analyzing threaded components on the production floor. However, they can't provide actual values for individual thread characteristics of lead and angle. Rather, lead and angle errors are expressed as a percentage or a differential of the pitch diameter tolerance.
Technology has been relatively static since the invention of the optical comparator and the development of the three-wire method of measurement (MOW). These technologies are pervasive, but industry should be aware of the shortcomings of these antiquated methods.
Few know that the MOW doesn't measure pitch diameter; it measures thread groove diameter (ASME B1.3, table 1, item 8, columns D1 and D2). These two measurements are distinctly different if lead or angle error is present. Other problems might also develop with the MOW measurement. Technicians must ensure that they have the required spindle pressure on the thread under examination because too much will generate deformation of the thread setting or work plug. They must be confident that the anvils are parallel before measurement. Finally, technicians must be careful with math and transcription errors because they must subtract the wire constant and apply the general formula to derive a proxy for the pitch diameter.
However, the greatest problem is lack of conformity. When inspecting a master thread setting and work plugs, it's common practice to examine only two thread characteristics--pitch and major diameters. This isn't acceptable. Only a long-form certification that provides actual measured values for specific thread characteristics (e.g., major, minor and pitch diameters; lead; angle; taper; straightness; and roundness) is supported by commercial and military standards. In rare instances where a long-form certification is provided, customers frequently receive a "within tolerance" for lead and angle measurement. This isn't sufficient because it doesn't indicate that the parameter was actually measured.
To meet the requirements listed in the ASME B1.2 specifications, a laboratory would have to invest in a bench-measuring micrometer, optical comparator and a lead analyzer. After ensuring that this equipment and its ancillary parts (e.g., thread wires, gage blocks and optical chart overlays) are calibrated, a technician will spend 30 to 45 minutes completing a full calibration.
In summary, not meeting the certification- requirements exposes industry to undue risk. Standards aren't being met because the current practice is time-consuming and too dependent on the operator's skill and experience. Furthermore, due to dependence on the human element, it's difficult to replicate results on current metrology equipment.
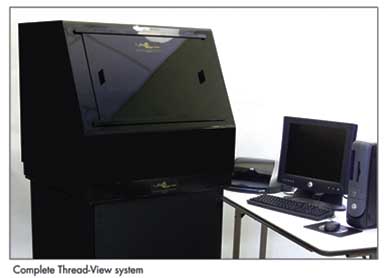
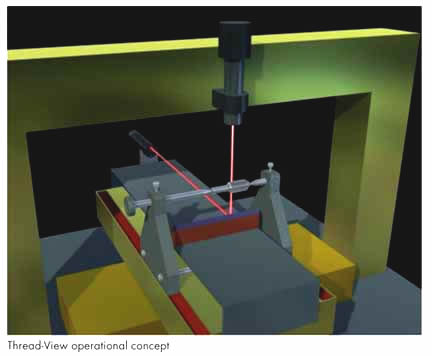
Technology has advanced to the point that these limitations can be overcome through the use of vision-inspection technology. The Johnson Thread-View System Model 3620 is an example of a system that works independently of the operator, as seen in the images below.


In such a system, the thread is held between two adjustable arbors on a stage that can travel in the X or Y direction. A collimated light source, seen in back in the image at the bottom of page 22, is reflected off of a mirror just below the thread. The lens and camera system, just evident in the top of the image, captures the resulting back-lit image and transfers it to the computer. All of these components rest on a vibration-resistant base and bridge subassembly. The physical dimensions of the system shown here are approximately 36 in. × 36 in. × 40 in., with a weight in excess of 650 lb. The mass is required to dampen any floor or acoustic vibration in the surrounding environment.

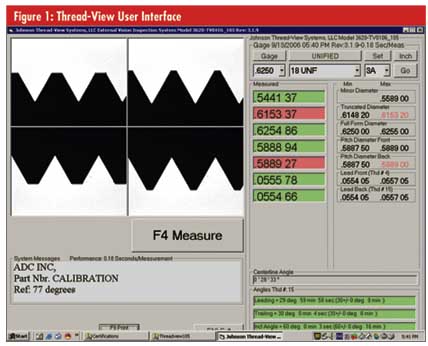
This noncontact system works in a Microsoft Windows environment. After loading the component between the arbors, the operator uses a mouse to select the thread size, pitch and class from drop-down menus on the main screen (as seen in figure 1 above). The minimum and maximum tolerances are automatically populated. When the cycle is complete, a green light indicates that the measurement is within specification, and a red light indicates that the parameter is out of tolerance. A certification is automatically generated and electronically stored.
The benefits of systems of this type fall into three general categories:
1. By removing the human element from the measurement process, errors attributable to bias (e.g., "What was the measured value last year?"), feel (e.g., "That seems about right") or transcription problems (e.g., the measurement indicates 0.4545 in. but 0.4554 in. was recorded) are eliminated. Measured values are inherently more accurate and repeatable.
2. For calibrating set and work plugs, a user can meet ASME requirements in approximately two minutes. Verifying the dimensional conformance, including exact values for each thread characteristic, can be accomplished for a fraction of current costs. This requires minimal training and allows a quick cycle time, presenting tremendous savings.
3. The system provides assurance that the inspection process is meeting requirements. In terms of risk mitigation, a manufacturer can determine if its threaded components will meet their intended design functions.
Today the solution to ensuring proper thread performance is the same two-step process that was used four decades ago: Educate industry regarding proper thread inspection and gage calibration, and meet current thread-inspection standards.
Given recent advancements in technology, it's now easier and more affordable to meet thread-inspection requirements. Dimensionally nonconforming characteristics can be immediately recognized and, where dimensional characteristics are concerned, the mystery surrounding the root cause of failure is no longer an issue. Manufacturers and users of threaded fasteners and thread gages should insist upon a full-form certification.
Stanley P. Johnson is president of Johnson Thread-View Systems LLC and a past member of the ASME B1 committee that set threaded product and gage standards for the industry. In 2001, he created the Thread-View Model 3620 System, a noncontact thread-inspection system.
His grandfather, Charles G. Johnson, invented the AGD split-ring gage. His father, Paul W. Johnson, developed indicating gages.
The company offers a screw-thread technology seminar. For research studies on the effect of dimensional nonconformance on thread performance, visit the company's Web site at www.johnsonthread-view.com/case.htm.
|