What do you mean, 'the parts are no good'?" the production manager screamed. "We just made that same part last
month and it was fine. What happened? Now my whole production schedule is shot. You're fired! You're all fired!" Fortunately for the production manager, the quality manager had
once run a production department and could empathize. He knew what was wrong--he just didn't know how to go about explaining it. The quality manager opened the database,
searched for the part that had been made incorrectly and found the relevant dimension. In the last two years, that dimension had been reported 150 times. He made a line graph of the data (see
Figure 1) and showed it to the production manager. "Is this supposed to mean something to me?" the production manager snarled. "Well," the quality manager said, "look at the data. It's all on the lower
specification limit." "No, it's not. Look at points 63 and 100: They're almost on nominal. And points 41, 42 and 43 are well below the lower specification limit."
"I misspoke," the quality manager said patiently. "I should have said, 'a great deal of your data is on or near the lower specification limit.' You shouldn't run
that way. It's dangerous. If any little thing goes wrong, you'll be making bad parts. It's better to run at nominal."
"It doesn't matter where we run," groaned the production manager. "The idiots I have working for me can make anything wrong. One time they make
good parts. Then they make the same part, on the same machine, and all of a sudden everything's wrong. It drives me crazy."
"I understand your frustration. But come over to my computer; I want to show you something." "So?" The production manager stuck out his chin as he scanned the computer
screen. "Look at your Cpk," the quality manager said. "It's 0.36. Your Cp is 2.38. In a way, this is good news. It's always easier to shift the mean than it is to
reduce the standard deviation." "Come on," the production manager moaned. "Speak English."
"Look at it this way. The Cp is a measure of process capability. We like it to be at least 1.33. Yours is 2.38, so that's very good. But the Cpk also takes
into account how well the process is centered. Yours is not well-centered; you're running on the lower specification limit. All you have to do is shift the
mean, which in your case means buy a larger pin. Then, when you mold the inside diameter of this part, it will be slightly larger. You can make a significant
process improvement with an easy, one-time adjustment." The Cpk is a ratio between the specification limits and the control limits (see Figure 2). X doublebar: grand average
S: standard deviation
USL: upper specification limit
LSL: lower specification limit
UCL: upper control limit
LCL: lower control limit
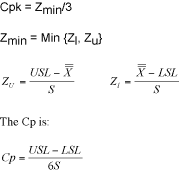
Typically, the control limits are fixed at �3S (sigma). Therefore, as the Cpk becomes larger than one, the process becomes more capable. The larger the
Cpk, the more robust the process is. Accordingly, the Cpk could be defined as follows: 
Too many people think of their parts as good or bad. The truth is that without
SPC they're just plain ugly. About the author
Gregory P. Ferguson is quality manager of Parker Hannifin's Tucson, Arizona, facility. He has published articles and assisted in the publication of two books. E-mail him at gferguson@qualitydigest.com . |