| by David Beamish
The first hand-held instrument specifically designed to ultrasonically measure coating thickness appeared 10 years ago. Many industries now use this form of nondestructive testing technology in their quality programs. They support or replace destructive measurement techniques for concrete, wood, plastics and other materials.
Testing the thickness of coatings such as paint over metal is common. Typically, it’s performed using one of two nondestructive measurement principles. When the base metal is iron or carbon steel, instruments employing a magnetic method are used; eddy current devices are used for other metals.
Despite these instruments’ popularity, they can’t measure coating thickness over nonmetal substrates. For these parts, measurement techniques include optical cross-sectioning, micrometer height measurement, gravimetric mass and area measurement, wet-film thickness gages to estimate cured film thickness, and substitution methods whereby a small metal panel is placed alongside the part and coated simultaneously. Difficult and time-consuming, these tests are often subject to operator interpretation and other measurement errors.
A typical destructive technique requires cutting the coated part in a cross section and measuring the film thickness by microscopically viewing the cut. Another cross-sectioning technique uses a scaled microscope to view a geometric incision through the dry-film coating. To do this, a special cutting tool makes a small, precise V-groove through the coating and into the substrate. Gages are available that come complete with cutting tips and illuminated scaled magnifiers. A detailed description of this test method is provided in ASTM D4138-94 (2001), “Standard Test Methods for Measurement of Dry Film Thickness of Protective Coating Systems by Destructive Means” (ASTM, 2001).
Although this method’s principles are easy to understand, opportunities abound for introducing errors. It takes skill to prepare the sample and interpret the results. Also, adjusting the measurement reticule to a jagged or indistinct interface can generate inaccuracy, particularly between different operators. This method is used when inexpensive, nondestructive methods aren’t possible, or as a means of confirming nondestructive test results.
The quality profession is already familiar with various aspects of ultrasonic testing, wherein high-frequency sound energy is used to conduct examinations and make measurements. Ultrasonic testing can detect and evaluate flaws, measure dimensions, ascertain material characterization and more. Classic nondestructive inspection for structural defects is a vital component in maintaining functional systems such as aircraft parts, boiler components and building structures. Air-coupled transducers, for example, check for delamination in plywood. For some industries, UT inspection to prevent failures is an important issue, especially in situations where an accident can result in disaster for both humans and the environment. Important UT tasks include testing for welding integrity and corrosion on structures. Ultrasonic testing is even useful for quality detection and to sort fruit and meat products.
Wall-thickness measurement is perhaps the most common and simple ultrasonic test. Precision ultrasonic wall-thickness gages, or corrosion gages, permit quick thickness measurement of objects without requiring access to both sides.
However, these gages aren’t ideal for coating measurement. Although they can approximate the depth of some thicker coatings, they’re not sufficiently sensitive to measure paint, lacquer and other finishing materials typically used on nonmetal parts.
A breakthrough in ultrasonic testing occurred 10 years ago when the first hand-held instrument designed specifically for coating thickness appeared on the market. The PosiTector 100 from DeFelsko Corp. is now into its third generation, but the basic operating principles remain the same. A single-element transducer is used with advanced numerical techniques to filter and enhance digitized echoes. These instruments are simple to operate, affordable and reliable.
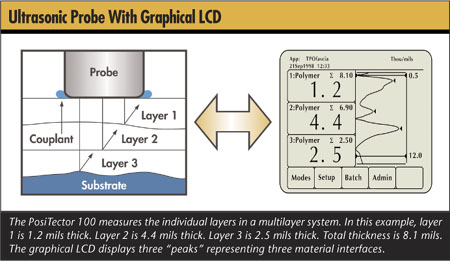
Ultrasonic testing measurement works by sending an ultrasonic vibration into a coating using a probe (i.e., a transducer) with the assistance of a couplant applied to the surface. This vibration travels through the coating until it encounters a material with different mechanical properties--typically the substrate but perhaps a different coating layer. The vibration is partially reflected at this interface and propagates back to the transducer. Meanwhile, a portion of the transmitted vibration continues to travel beyond that interface and experiences further reflections at any material interfaces (see left side of figure below).
Because a large number of echoes could occur, the gage is designed to choose the maximum or “loudest” echo from which to calculate a thickness measurement. Instruments that measure individual layers in a multilayer application also choose the loudest echoes. The user simply selects the number of layers to measure--say, three--and the gage measures the three loudest echoes. Softer echoes from coating imperfections and substrate layers are ignored.

Coatings perform a variety of functions for the nonmetal substrates they cover. Some coatings restore, protect, waterproof and beautify wood, masonry or concrete structures. Others fill pores and surface defects in masonry or concrete and provide an aesthetically pleasing surface texture. Thick elastomeric coatings provide flexible, long-lasting resistance to salt spray, chemical attack and/or normal weathering. They bridge hairline cracks and continue to expand and contract during their service lives.
On wood surfaces, appearance often plays a major factor. Some wood coatings minimize the rate and range of changes in the wood’s moisture content. Others, such as solventless polyurethane, provide a tough, flexible and impact-resistant protection much like plastic. Penetrating finishes are absorbed into the wood and harden to create a strong protective barrier that won’t flake.
The plastics industry in particular benefits from ultrasonic coating thickness testing. With some automotive applications, several layers are required to attain full aesthetic appearance and protective properties. Not only does an exterior finish strongly reflect the quality and durability of costly consumer products, but coatings for plastic components must also address challenges unique to plastic substrates, including adhesion, flexibility and temperature constraints.
Primers fill any small imperfections from the molding process while providing a conductive layer that facilitates the electrostatic application of subsequent coating layers. Primers also protect the substrate from potentially damaging UV light and provide resistance to chemicals (e.g., gasoline) and humidity.
Applied in single or multiple layers, the base coat provides most of the color, physical performance and aesthetic effect. However, distinguishing between these layers can pose a challenge for ultrasonic gages, depending on the application method. Resistant clear coats form the protective interface from environmental factors such as etching, bird droppings, car wash scratches and stone chips.
Manufacturers and applicators alike have long believed that there are no simple and reliable means for nondestructively measuring coatings on plastic substrates. Their common solution was to place metal (e.g., steel or aluminum) coupons next to the part and then measure the thickness applied to the coupon with either a mechanical or electronic gage. This labor-intensive solution assumes that a flat coupon placed in the general coating area receives the same paint profile as the plastic part in question.
An ultrasonic solution enables the user to measure the total coating thickness of the actual part. The testing instrument is operated in much the same fashion as a conventional magnetic or eddy current gage. Thus, little or no extra training is required for operators painting both plastic and metal parts. Depending on the coating application process, some ultrasonic gages offer the advantage of identifying distinct layers when they’re applied at thicknesses greater than 25 µm. This useful capability is unique to ultrasonic coating thickness technology.
A factor influencing the accuracy and repeatability of any coating measurement is the interface between the coating and the substrate.
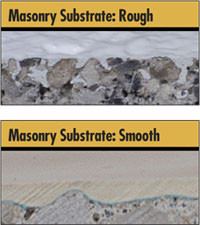
An extreme example is a masonry application where a rough coating/substrate interface intensifies the problems involved in other applications. The figures below shows two examples of coated concrete.
 These photos, taken at a higher resolution than most field destructive tests, clearly show the boundary between the coating and substrate. On the surface, the coating might look smooth, but the thickness below isn’t always consistent. Masonry substrates are often porous and exhibit varying degrees of surface roughness. While useful in promoting adhesion, such porosity and roughness increases the difficulty of attaining repeatable thickness measurement. These photos, taken at a higher resolution than most field destructive tests, clearly show the boundary between the coating and substrate. On the surface, the coating might look smooth, but the thickness below isn’t always consistent. Masonry substrates are often porous and exhibit varying degrees of surface roughness. While useful in promoting adhesion, such porosity and roughness increases the difficulty of attaining repeatable thickness measurement.
Ultrasonic gages are designed to average small irregularities and produce meaningful measurements. On particularly rough surfaces, or on substrates where individual readings might not seem repeatable, comparing a series of averaged results often will provide acceptable repeatability. Documents such as SSPC-PA2, “Measurement of Dry Coating Thickness with Magnetic Gages” (ASTM, 2002) outline standard methods and useful strategies for this technique.
If more detailed information about this coating/substrate interface region is desired, ultrasonic instruments with a graphical LCD illustrate substrate roughness by displaying wide peaks when the substrate is rough and narrow peaks when it’s smooth, as shown in the figure below.
This type of display is useful when measuring coating systems where the number of layers is unknown. In the hands of a skilled operator, the gage presents interface information about bond strength and material densities.

Ultrasonic testing brings distinct benefits to the wood industry as well. Furniture, flooring and musical instrument manufacturers often apply several layers of lacquer or similar finishing materials to ensure the wood is properly filled. Some processes require manufacturers to identify the thickness of individual layers or series of layers. For example, when applied at the wrong thickness, the coating layer that beautifies and protects a high-quality guitar can easily detract from its sound. Too much coating can dampen the guitar’s acoustic resonance, while too little can have the reverse effect.
Companies using destructive methods face many challenges that can result in inaccurate, expensive and time-consuming measurements. To destructively test a lacquer, for example, it must be heated and a small piece cut out of the surface. While still hot, the piece must be stripped from the substrate by hand and measured with a micrometer. This method can often tear and distort the coating, making it difficult to measure accurately. In addition, the wood products used for testing must be scrapped. Moreover, to get a statistically representative sample, several wood products from a lot might need to be scrapped as part of the destructive testing process.
Wood instrument manufacturers now use ultrasonic gages to accurately and nondestructively measure the lacquer on their valuable products. As a result, they’ve not only decreased their lacquer usage, but they’re able to take meaningful measurements without excessively disrupting their production process. There’s no need to scrap product to measure a coating thickness, and the thickness over the entire surface can easily be measured to ensure a smooth, even coating. Rework is minimized due to improved control of the coating process.
Any ultrasonic measurement’s accuracy is directly related to the sound velocity of the measured material. Sound travels slower through paint, for example, than it does through metal. Because ultrasonic instruments measure the transit time of an ultrasonic pulse, they must be calibrated for the speed of sound of that particular material.
From a practical standpoint, sound velocity values don’t vary greatly among the coating and lining materials used in the corrosion-prevention industry. Therefore, ultrasonic coating thickness gages don’t usually require adjustment to their factory calibration settings.
However, to ensure optimum accuracy--especially when measuring a coating for the first time--a known thickness of that coating is measured ultrasonically. Methods for obtaining the value of this known thickness include removing the coating and measuring with a micrometer, cutting the coating and viewing the cut under magnification, or applying the coating to a metal substrate and measuring it with a magnetic or eddy current gage. The coating is then measured with the ultrasonic gage, and if the result isn’t within the known thickness tolerance, the displayed value is adjusted to match the thickness value obtained by other means.
Quick, nondestructive thickness measurements are now possible on materials that previously required destructive testing or lab analysis. These materials include:
 Urethanes, lacquers and two-component polyurethanes on wood and wood products Urethanes, lacquers and two-component polyurethanes on wood and wood products
 Paint on gypsum board Paint on gypsum board
 Multilayer coatings on automotive plastic Multilayer coatings on automotive plastic
 Coatings on carbon fiber composites Coatings on carbon fiber composites
 Conformal coatings on fiberglass-printed circuit boards Conformal coatings on fiberglass-printed circuit boards
 Latex paints, acrylics, lacquers, urethanes, epoxies and polyester resins on masonry substrates, including stone, brick, tile, concrete, asbestos-cement board, renderings and plasterboard Latex paints, acrylics, lacquers, urethanes, epoxies and polyester resins on masonry substrates, including stone, brick, tile, concrete, asbestos-cement board, renderings and plasterboard
 Other homogeneous coatings on nonmetal substrates Other homogeneous coatings on nonmetal substrates
Testing can be done without significantly disrupting the production process. Potential cost reductions include:
 Minimizing overcoating waste by controlling the thickness of the coating or the application of the lining Minimizing overcoating waste by controlling the thickness of the coating or the application of the lining
 Minimizing rework and repair through direct feedback and improved process control Minimizing rework and repair through direct feedback and improved process control
 Eliminating the need to destroy or repair objects due to destructive coating thickness measurements Eliminating the need to destroy or repair objects due to destructive coating thickness measurements
Ultrasonic coating thickness measurement is an accepted and reliable testing routine used in many industries. It replaces costly destructive techniques, and the standard test method is described in ASTM D6132-04, “Standard Test Method for
Nondestructive Measurement of Dry Film Thickness of Applied Organic Coatings Using an Ultrasonic Gage” (ASTM, 2004). To verify gage calibration, epoxy-coated thickness standards are available with certification traceable to national standards organizations. Today, these instruments are simple to operate, affordable and reliable.
David Beamish is general manager of DeFelsko Corp., a New York-based manufacturer of hand-held coating thickness test instruments. He holds a degree in civil engineering and has more than 16 years’ experience in the design, manufacture and marketing of these testing instruments in a variety of international industries, including industrial painting, quality inspection and manufacturing. He conducts training seminars and is an active member of various organizations including NACE, SSPC, ASTM and ISO.
Parts of this article are excerpted from a previous article published by the author in Materials Performance Magazine, September 2004.
|